Acronyms are fascinating aren't they? Up until now I've gone my entire life without knowing what a CAL or KAL was. I wonder now how I ever managed without either of them. They are so addictive.
A CAL is a crochet-a-long and a KAL is, you guessed it, a knit-a-long. There are many KALs and CALs. Many of these available by subscription from local and online yarn stores, designers and of course Ravelry. There are mystery KALs too and these are so addictive.
You see I get bored knitting. Eager to start a project, I am even more eager to finish it. It has to go fast or I put it aside. This is one of the reasons I have mostly crocheted instead of knitted. Finishing things is never a problem when I crochet. Knitting for me is another story.
I do have to stop adding new projects to my Rav notebook, really. Un-hunh, yes I mean it!
But I was scrolling around the forums on Rav yesterday and found another mystery shawl kal. This is a free kal, nothing to buy. The first clue came out in January but sign-ups are still allowed until February 13th.
Ya know I had to right? I just couldn't help myself. I joined the group and downloaded the first clue. I'm not that far behind actually. The first clue is only 52 rows and there is still time in February to catch up with February's clue.
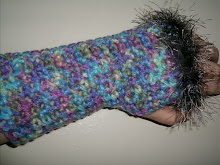
I chose Gems Merino in fingering weight in a lovely medium olive green. I have some other shades so if I need to do a graded colourway I can. Stitches have been cast on and I'm 13 rows into the clue. Because of my hands I have to stop and rest every couple of rows but I can see the pattern developing. It is so exciting!
What I think I like about kals especially mystery kals is that you get the pattern in small chunks. I can do small chunks and I love the anticipation about what comes next. I think I might actually finish this one.
If you are interested in doing this kal you had better hurry. Sign-ups close on Feb. 13th. Head on over to Ravelry and look for the group 2010 Lace Sampler Mystery KAL.
Year Long Mystery Shawl KAL
Labels: 2010 Lace Sampler Mystery KAL 0 comments
![]()
![]()
10 Shawls in 2010
Labels: 10 shawls in 2010, Ravelry 0 commentsWhen Ravelry started up I joined thousands of other knitters and crocheters and signed up for a free account. I learned about Ravelry from the discussion group for the Etsy Hookers Team. There were so many new users wanting to join that there was a queue with only a relatively small number being accepted each day. It was kind of fun checking to see where you were in the queue.
Eventually, my application for an account was accepted and I was in. It offers a great place to network with others pursuing like interests. Each account comes with a database for storing information about your stash of yarn and fiber; your projects that are works in progress and also to queue up projects you want to work on.
However, to be honest I did not do much with the account once I got in. I checked back every now and again but really did not get 'into it'. Until this year that is.
I wanted to challenge myself in 2010; to find something that would be fun and different yet still within my range of ability to accomplish. I popped into Rav. to search their pattern database. While I was there I took a look at the groups section.
I found a group called 10 Shawls in 2010. The premise is that members will challenge themselves to knit or crochet 10 shawls in 2010. I had just subscribed to my first mystery kal as well as my first lace shawl so this group really appealed to me.
My first shawl was completed in January. It was crocheted from a free pattern called Sezession I and was designed by Rodger Murry. I used two balls of Patons Decor in a variegated colour called Country Roses.
This was a very simple shawl and worked up quickly. It made a great start to my challenge giving me a wonderful sense of accomplishment.
I've queued up other projects which will be more technically challenging like the Evanstar mystery kal. Never having done any lace knitting before this project should satisfy my urge to learn some new stitches and try new techniques.
![]()
![]()
New Year, New Layout
Labels: new layout 0 commentsSomething wierd happened a few weeks ago. My layout went crazy. It may have been that the author of the layout who was graciously hosting the images used changed the filenames or their photo host account went dormant. Whatever happened things from my end did not look good.
It took me a while to figure it out. I tried to upload a new template and lost just about all of my widgets. So I'm starting all over. I have instructions from Amanda at Bloggerbuster (where I got my old theme) on how to edit this layout to add some cool features.
In the meantime please pardon my dust as I try to spiff this blog up again. Maybe this time it will be even better. TTFN.
Oh yeah, Happy New Year everyone! May it be gentle and kind to us all.
![]()
![]()
Disclosure Policy
Labels: Disclosure Policy 0 commentsThis policy is valid from 19 December 2008
This blog is a personal blog written and edited by me. This blog accepts forms of cash advertising, sponsorship, paid insertions or other forms of compensation.
This blog abides by word of mouth marketing standards. We believe in honesty of relationship, opinion and identity. The compensation received may influence the advertising content, topics or posts made in this blog. That content, advertising space or post will be clearly identified as paid or sponsored content.
The owner(s) of this blog is compensated to provide opinion on products, services, websites and various other topics. Even though the owner(s) of this blog receives compensation for our posts or advertisements, we always give our honest opinions, findings, beliefs, or experiences on those topics or products. The views and opinions expressed on this blog are purely the bloggers' own. Any product claim, statistic, quote or other representation about a product or service should be verified with the manufacturer, provider or party in question.
This blog does contain content which might present a conflict of interest. This content will always be identified.
To get your own policy, go to http://www.disclosurepolicy.org/
![]()
![]()

How to Select Paint Brushes for Silk Painting
Labels: crafts, silk painting, silk scarves 0 commentsWhen painting, having the right kinds of brushes makes a world of difference. This is especially true for silk painting. Silk is a delicate fabric, and using the wrong brushes could have devastating effects. Besides that, the paints and dyes used on silk are very different from the paints used on canvas and other materials.
Experienced and frequent silk painters often have a veritable arsenal of brushes. They have rounded brushes, flat brushes, thin brushes and flat brushes. Many are dedicated to a specific brand, and they often prefer those with animal hair as opposed to synthetic bristles. The brushes they use tend to be quite expensive.
It's true that animal hair brushes offer certain advantages over synthetic ones. They have a softness that simply can't be reproduced with man-made materials. This allows them to soak up much more dye, making it easier to fill in areas large and small. It also makes them safer to use on fragile silk and silk blends.
Many professional silk painters use sumi brushes with bamboo handles and goat hair bristles, which become stiffer in the center and soak up more liquid than regular brushes. Sumi brushes have been used by Chinese silk painters for centuries.
But for beginners, it may not make sense to spend a lot of money on high-end silk painting brushes. Until you decide whether or not you want to do silk painting on a regular basis, it's probably best to use less expensive brushes. Synthetic watercolor brushes work reasonably well for silk painting. They may not hold as much paint or dye as natural ones, but they will not harm the silk. They should do fine for your first few projects.
Foam Brushes
No silk painting brush collection is complete without some foam brushes. The larger ones work very nicely for coloring in large areas, and they're especially useful when applying fixatives and primers. You can also purchase smaller ones (which look similar to eye shadow applicators or cotton swabs) that are great for applying resist and creating details with silk paint.
Foam brushes are usually very inexpensive. However, most of them must be replaced frequently. If you find them useful, it might be best to buy them in bulk.
The sizes and types of brushes used by one silk painter might be completely different from those used by another. The brushes you'll need depend largely on your preferences and the techniques you use. Just remember that there is no one brush that will do everything you need to do. In order to be successful at silk painting, you'll need at least a few different sizes of brushes, and probably a couple of different types.
![]()
![]()
Beginners' Silk Painting Projects for Children and Adults
Labels: crafts, kids, silk painting, silk scarves 0 commentsSilk painting is a unique and beautiful technique. Silk was once frequently used in paintings in the same manner in which canvas is used today. Using silk as the basis for a masterpiece is less common now, but silk may be used to create a wide variety of projects. Here are a few that are appropriate for beginner silk painters of all ages.
Silk Scarves
The silk scarf is a luxurious accessory, and it makes a wonderful gift for almost any woman. And when it's painted by hand, it takes on an even more special meaning. A silk scarf is a great first project for those who would like to try their hand at silk painting.
One of the great things about silk scarves is that they do not necessarily have to have an elaborate pattern. Dyes can be used to give them a tie dyed look. This is great news for newbies, because working with silk dyes and paints can be rather tricky at first. Simple abstract designs allow you to get a feel for how these mediums interact with silk without having to worry about precise detail.
Shirts
Silk shirts may be larger than scarves, but they too look nice with less defined patterns. As long as you choose colors that complement each other, there's little chance of ruining the shirt. This is a good project to move on to once you've gained confidence with scarves.
Suncatchers and Ornaments
Stained glass suncatchers add a touch of color to any home. But did you know that you can make suncatchers out of silk, too? You'll have to learn to use resist to keep colors in confined areas and apply dyes so that they are of the correct intensity, but with the small size of most suncatchers, you won't lose a lot of silk if you make a mistake.
You can also make ornaments for Christmas and other occasions in much the same way you make suncatchers. You'll need little more than a small frame, some silk, dye or paint, and brushes. You can find kits to make these items at some craft stores, as well as online.
Greeting Cards
Making silk-painted greeting cards requires some assembly, but otherwise it's as easy as painting a scarf. You can use resist to create some definition, or go abstract with dye only. Cards designed to hold painted silk usually feature a cutout of some sort of shape, so it's hard to go wrong.
These projects are great for learning the basics of silk painting. And when they're complete, they make lovely gifts. If you love the look of painted silk, why not give one of them a try?
![]()
![]()